Shakarpara recipe
Shakarpara, also known as Shankarpali or Shakkarpare, is a traditional Indian sweet snack that holds a special place in our hearts, especially during festive seasons like Diwali and Holi. These crispy, golden-brown bites are not only a treat for the taste buds but also a reminder of our rich cultural heritage. In this blog post, we’ll take a deep dive into the world of Shakarpara, exploring its history, ingredients, step-by-step recipe, and some helpful tips and tricks to ensure perfect results every time.

About of Shakarpara
Shakarpara is a quintessential Indian snack enjoyed across the country for its crunchy texture and sweet flavor. Made from simple ingredients like all-purpose flour, sugar, and ghee, This recipe is surprisingly easy to prepare at home. Whether you’re celebrating a special occasion or simply craving a delicious treat, Shakkarpara never fails to satisfy.
Shakarpara has a rich history dating back centuries. Originating in North India, it was traditionally prepared during festivals and special occasions. Over time, it has evolved into a beloved snack enjoyed throughout the year. The name “Shakarpara” is derived from two words: “shakar” meaning sugar and “para” meaning piece. Together, they represent the sweet, crunchy nature of this delightful snack.
How To Make Shakarpara recipe
Ingredients Required for Making this sweet
To make Shakkarpara at home, you’ll need the following ingredients:
- 2 cups all-purpose flour (maida)
- 1/2 cup semolina (sooji)
- 1/2 cup powdered sugar
- 1/4 teaspoon salt
- 1/2 teaspoon cardamom powder
- 4 tablespoons ghee (clarified butter)
- Water, as needed
- Oil for frying
Step-by-Step Recipe for Shakarpara

1. Prepare the Dough
In a large mixing bowl, combine the all-purpose flour, semolina, powdered sugar, salt, and cardamom powder. For the ingredients to be distributed evenly, thoroughly mix. Add the ghee and rub it into the flour mixture until it resembles breadcrumbs.
2. Knead the Dough
Gradually add water, a little at a time, and knead the mixture into a firm dough. The dough should be smooth and pliable, neither too soft nor too stiff. Cover the dough with a clean kitchen towel and let it rest for 15-20 minutes.
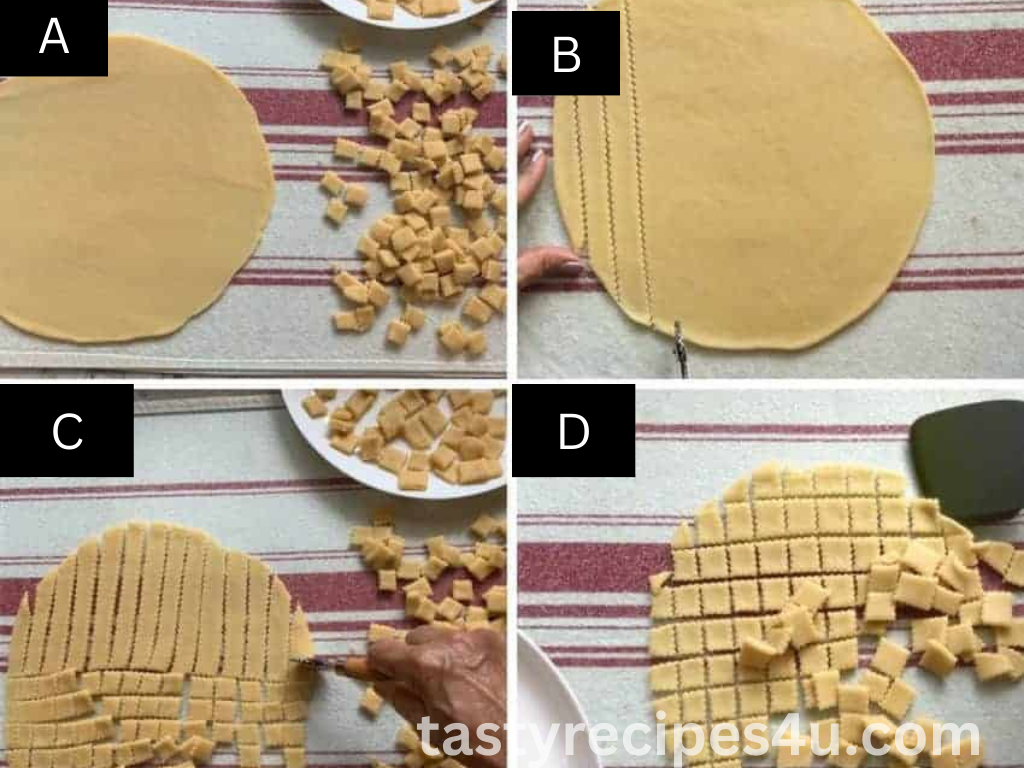
3. Roll and Cut
Divide the dough into small portions and roll each portion into a thin sheet, about 1/8 inch thick. Use a sharp knife or a cookie cutter to cut the rolled dough into diamond or square shapes. Prick each piece with a fork to prevent them from puffing up during frying.
4. Fry the Shankarpali
In a kadai or deep fryer, warm the oil over medium heat.
Once the oil is hot, carefully add the cut Shakkarpara pieces in batches, making sure not to overcrowd the pan. Fry them until they turn golden brown and crispy, flipping them occasionally for even cooking.
5. Drain and Serve
Using a slotted spoon, remove the fried Shakkarpara from the oil and drain them on paper towels to remove excess oil. After they are completely cool, move them to an airtight storage container.
Common Mistakes to Avoid
- Adding too much water to the dough, resulting in soft and chewy Shakarpara instead of crispy ones.
- Overcrowding the frying pan, which can lead to uneven cooking and soggy Shakkarpara.
- Forgetting to prick the Shankarpali pieces before frying, causing them to puff up and lose their shape.
Tips and Tricks for Perfect Shakarpara
- Use Fresh Ingredients: Make sure your flour, semolina, and ghee are fresh for the best results.
- Knead the Dough Well: Proper kneading ensures a smooth texture and crispy finish.
- Maintain Oil Temperature: Fry the Shakkarpara in oil that is neither too hot nor too cold to prevent burning or undercooking.
- Store Properly: Store the cooled snacks in an airtight container to maintain their freshness and crispiness for longer.
Serving Suggestions
Shakarpara pairs well with a hot cup of tea or coffee, making it the perfect snack for tea-time gatherings or lazy evenings at home. It can also be served alongside other festive sweets like ladoos and jalebis during celebrations.

Health Benefits of Shakarpara
While this is undoubtedly a delicious treat, it also offers some health benefits when consumed in moderation. The use of whole wheat flour, semolina, and minimal sugar makes it a better alternative to store-bought snacks. Additionally, the presence of ghee provides energy and aids in digestion.
FAQs About Shakarpara
1.How many Shakarpara does this recipe yield?
This recipe makes approximately 60-70 pieces of Shakarpara, depending on the size and thickness.
2.Is it possible to substitute whole wheat flour for all-purpose flour?
Yes, you can substitute whole wheat flour for a healthier alternative, but the texture and taste may vary slightly.
3.How long can I store Shakarpara?
When stored in an airtight container at room temperature, Shakarpara can last up to two weeks.
4.Can I bake Shakarpara instead of frying?
Yes, you can bake Shakarpara in a preheated oven at 350°F for 20-25 minutes or until golden brown.
5.Can I add nuts or seeds to the dough?
Absolutely! Chopped nuts like almonds, cashews, or seeds like sesame or poppy seeds can be added for extra flavor and crunch.
6.Is it possible to cut the sugar content of the recipe?
Yes, you can adjust the amount of sugar according to your preference without affecting the texture of Shakarpara.
Conclusion
Shakarpara is more than just a snack; it’s a symbol of joy, celebration, and togetherness. Whether enjoyed during festive seasons or as a quick bite with tea, Shakarpara never fails to delight. With this easy-to-follow recipe and helpful tips, you can recreate this beloved treat in your own kitchen and share its sweetness with family and friends.